CONTENT

The Definitive Guide To Post-Processing

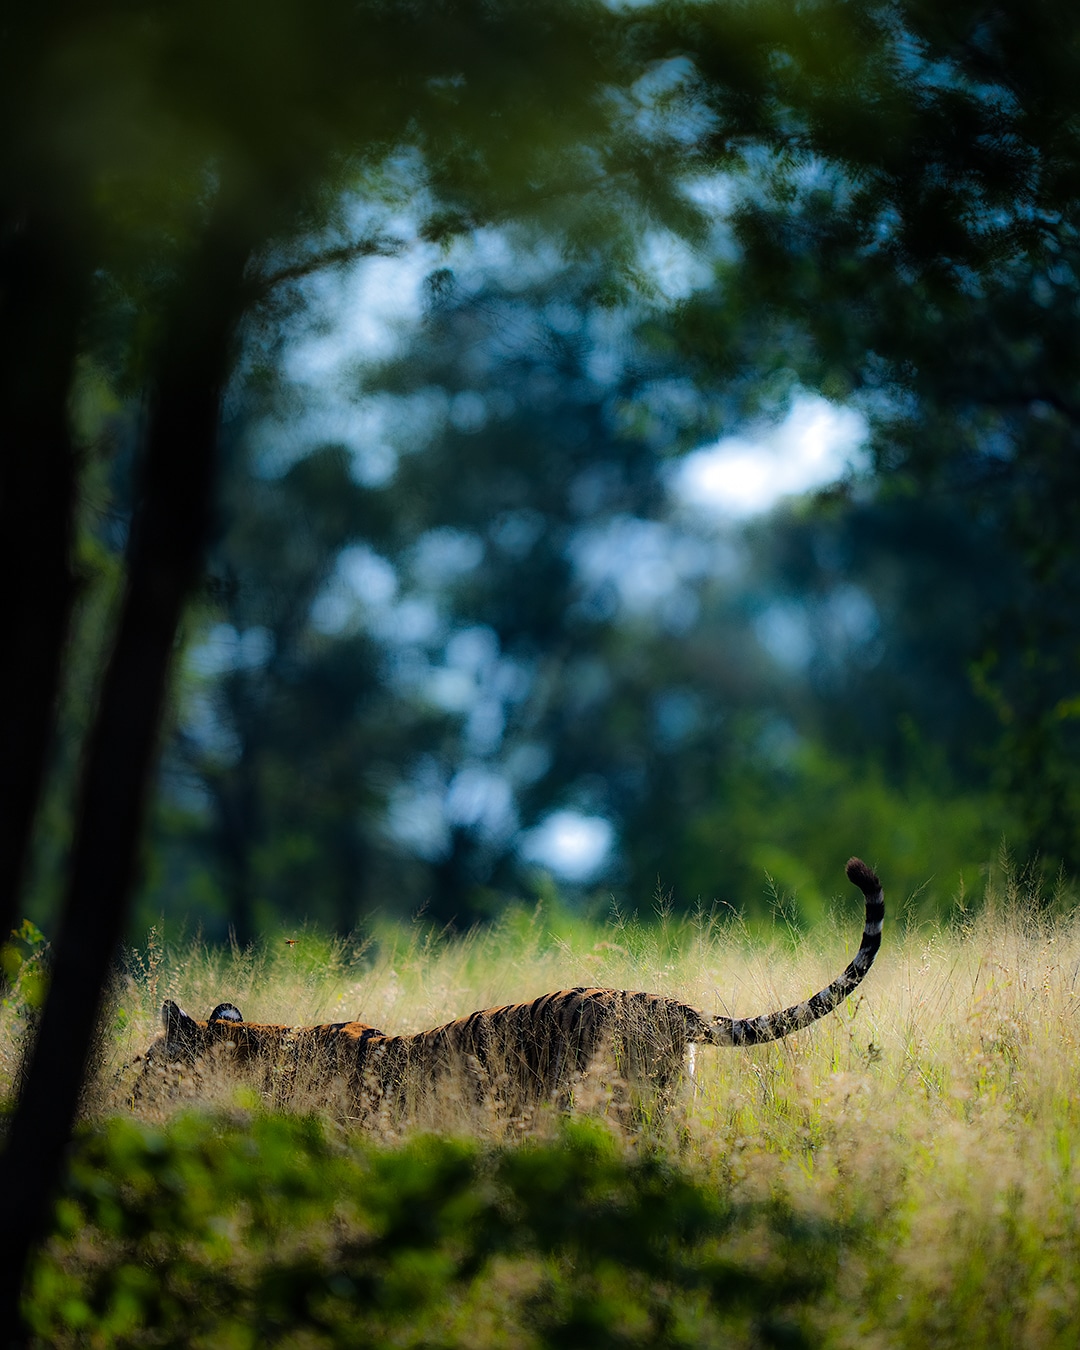
There are many guides to learn about post-processing in photography.

Also there are many ways to post-process the images.

But when you know how to use the knowledge of them tactically, you can make a difference.

That is what you are going to get in my definitive guide of post processing in photography using ACR (Adobe Camera RAW) and Photoshop.

You are going to learn:

  • The very basics of post processing (both RAW processing and JPG processing).
  • Why post-processing is important
  • Dos and Don’ts
  • Which step in post processing affects what
  • How to do post-processing the right way

You are also going to find out whether post-processing is image manipulation or image correction.

Before we dive into the guide, go through my post-processing tutorial using Adobe Camera RAW.

Let’s start with knowing what post-processing actually is…

What is post-processing in photography?

Tiger

Post-Processing refers to image editing in photography. It is an integral part of digital photography. And understanding the basic workflow will help you get the best out of your captured images.

Why do we have to post-process an image?

Personally, for me, post-processing is not image manipulation but image correction. The digital cameras have limitations with the dynamic range and the colors/tonality/contrast it can capture. Our human eye is much more capable of viewing the objects.

So when we click images, the chances of getting images as they are for the human eye are less.

Hence post-processing is needed to match the image to what you saw in the field.

DON’Ts in post-processing

don'ts in post processing

I follow basic post-processing. But I do not digitally alter or manipulate my images. For me Post-Processing is – show what you saw in the field, nothing more and nothing less. Of course, you can enhance the image a bit. It is like doing makeup and going to an event or party, but do not get a plastic surgery done. Of course, if someone wants to manipulate the image to make it look more beautiful, it’s an individual choice and nothing wrong in that.

Things I avoid in post processing:

  • Images, where the subject has been cut out and placed in a different background,
  • Morphed images
  • Combining two images of the same subject into one
  • Adding elements that were not originally preset while shooting.
  • Removing elements from the image which originally existed.

Remember, I do not want to show what I did not see in the first place. I just work on showing others what I see with my eyes. This opens door to what we have to do in post-processing.

DOs in post-processing

Depending on the photographer expertise and experience, it may always not be possible to get everything right the first time in the camera. We may commit some minor mistakes while photographing. We need to correct them in post-processing. Basic post-processing which I follow would generally include the following:

  • Crop and Straighten
  • Colour Correction
  • White Balance
  • Exposure Correction
  • Contrast and Clarity
  • Sharpening
  • Levels adjustment

Let’s get into knowing where we use the above steps individually..

#1 Crop & Straighten

straightening the image in post processing

Even though we take great care while capturing an image, there are chances of not getting image as we want, especially the composition aspect.

This may result in getting unwanted pieces of information at the edges and the image may get titled a bit.
In that case, we crop and straighten the image to clean up and correct any issues with composition.

#2 Colour Correction

color correction

Sometimes we may not get the colour of the image as we want. In that case we need to make corrections though it needs some expertise.
In that case, we can correct any colour casts and ensure the image colour is as accurate as possible.

#3 White Balance

white balance

White balance is the colour temperature of that image and is one of the parameters responsible to get you good colours in your image. Generally a lot of photographers keep this setting in auto white balance and hope to correct it during post processing. It is not a good practice as I always advice to get it right the first time out of the camera.

But when the things don’t fall into the place as we want, we can always correct that while post-processing an image.

#4 Exposure Correction

Exposure Correction

In some cases, underexposed and overexposed images are not desirable. When the image is either underexposed or overexposed we make exposure correction while post-processing. We perform this step to bring the optimal variant of the image.

Exposure correction improves the overall tonality and dynamic range of the image.

#5 Contrast

contrast adjustment

While taking photos, sometimes we need to get sharp images. In that case, to get sharp images we increase contrast. This can be performed using various algorithms in photoshop editor.

To sum up the points we perform this step to bring back any missing punch and bring out emphasis and detail.

#6 Sharpening

sharpening the image

Sharpening the images gives them the professional finish. Because, we can display images at their best by sharpening. It more clearly reveals the details of an image.

So we sharpen the images where necessary to bring out any key details.

In photoshop editor, we make use of all the above things to show the image at its best. Now I will take you through the process that I follow to edit photos in ACR and photoshop. It is not necessary to apply all the changes suggested. You decide what makes sense for your image and make the corrections accordingly.

RAW processing using Adobe Camera RAW: How to edit photos professionally using Adobe Camera RAW

In this section, I will take you through the step by step process for RAW image processing. We are going to touch the image in all aspects(stated above) one at a time to bring its best version out.

Here are the steps to follow if you are using Adobe Photoshop CC. (there may be slight variation in the version you use)

Setting the White Balance:

First and foremost thing to consider is white balance. Set the White Balance to match the actual scene.

In Adobe Camera RAW you can use the drop down to choose one of the presets (Daylight, cloudy etc).


The best way is to use the temperature slider to choose the value to get the correct lighting / colours in your image.

In case there is a slight colour shift even after setting the correct WB, you can use the Tint slider to adjust it. It is present just below the temperature slider.


The other basic settings used to correct the image in Adobe Camera RAW:

The below image has the other basic settings that we need to adjust. It has sliders to set the desired value for getting an optimal image.(perfect image)


Exposure:

I talked about exposure in my article on histograms. This will give you a clear idea about underexposed and overexposed images.

Use the exposure slider in case you want to overexpose or underexpose your image.
When you are making changes using the slider, you need to keep a watch on the histogram which is displayed on top of the tools and ensure the graph stays within the extremes.

Contrast:

Use the contrast slider to give a better punch in the image. This slider increases the colour depth in your image.

Highlights:

If the Whites in your image are overexposed, you may use highlights slider to get back some details in the whites.

Shadows:

Shadows slider is the opposite of highlights. You can get back the details in the shadow or dark areas of your images by using this slider.

Whites:

Whites slider increases the brightness of only the whites in your image.

Blacks:

Blacks slider is also responsible for increasing the bit depth. This slider is very useful for landscape images which have a lot of haze.

Clarity:

Clarity slider brings out more details in your image. If your original image is pretty sharp, then avoid using this tool. Play around with it to get a feel.

Vibrance:

Vibrance slider increases the saturation of only the vibrant colours in your image and not everything. I always use this compared to Saturation.

Saturation:

I avoid using saturation slider. This increases the saturation of all the colours in your image. We don’t want to do that.
DO NOT overdo any of the above settings. Use them minimally to improve upon a good image.

Converting and saving in Adobe Camera Raw

In Adobe Camera RAW, you need to put the below settings before saving the image. Click on the link which is shown at the bottom of the ACR tool:

Converting and saving
In Adobe Camera RAW, you need to put the below settings before saving the image. Click on the link which is shown at the bottom of the ACR tool:


The key settings to keep before saving in ACR are:

  • Under the Color Space, Keep the space like ProPhoto RGB or Adobe RGB
  • The Depth can be set to
    • 8 bits/channel for any web-based posting (FB, Instagram, Flickr, etc).
    • 16 bits/Channel, if you are planning for print.
  • Under Image Sizing, keep Resize to fit as default (box unchecked)
  • You will have to set the image resolution based on your end requirement.
    • For web-based posting (Facebook, Flickr, Instagram, etc) keep the Resolution as 72 pixels/inch (honestly it does not matter for web).
    • For prints, you need to keep the Resolution at around 300 pixels/inch and keep the image dimension as per the print requirement.
  • Rest all the settings, keep to the default shown.

Note: All the above is using Adobe Camera RAW. Similar settings will be available in Canon DPP or Capture NX.

JPG Processing Using Photoshop

After doing necessary changes in Adobe Camera RAW, it is time for JPG processing in photoshop. We do the initial photo editing in ACR cause it’ll make further editing in photoshop easy. Here is the step by step process for editing image in photoshop.

Step 1: Photoshop Settings | JPG Processing Using Photoshop

Before proceeding on jpg processing using photoshop, it is important to make these one time settings in photoshop:

  1. From the menu, choose Edit->Colour Settings and enter the below values
  2. Enter these values:


I will breakdown the necessary things, you need to do here, for you. We need to customize only in the settings, working space and colour management policies.

  1. Settings: Use the drop-down menu and choose “Custom“. You can name these settings as you want to distinguish easily.
  2. Working Space:
    1. RGB: ProPhoto RGB (if you do not have that, then choose Adobe RGB (1998))
    2. CMYK: Leave it to U.S. Web Coated……
    3. Gray: Gray Gamma 2.2
    4. Spot: Dot Gain 20%
  3. Colour Management Policies:
    1. RGB: Convert to Working
    2. CMYK: Preserve Embedded Profile
    3. Gray: Preserve Embedded Profile
  4. Keep the rest of them to the default.

Color Management Policies:
RGB: Convert to Working
CMYK: Preserve Embedded Profile
Gray: Preserve Embedded Profile

Rest, keep it to the default.

Once the above values are entered, you need to save it (This is a one time setting). Click on Save, give any name you would like to save it as, then enter the description regarding this profile you are saving and that’s it.

Step 2: Cropping | JPG Processing Using Photoshop

  1. Open the image in Photoshop
  2. Go to the Crop tool.
  3. Enter the width and height to crop in pixels or inches (for web choose around 1920 pixels on the longer side for horizontal images and around 1200 pixels for vertical images). Be sure to enter as 1920px (without the px, by default it will be inches)
  4. Drag over the area to crop and hit enter.

Step 3: Level Adjustments | JPG Processing Using Photoshop

1. Go to Image->Adjustments->Levels


There are three triangles as you can see in the above image:

  • The left triangle is to adjust shadow details
  • Right triangle is to adjust highlights
  • The centre triangle is to adjust brightness/darkness

.

Drag the left triangle to adjust it with the start of the graph. That should deepen your image.

Check how good the image looks visually and adjust accordingly.

You need to hold down the key (or Option key for Mac users) and drag the left or right triangle to make adjustments.

When you use the slider, a small amount of details will start to appear and you need to stop there.
You can use the centre slider to darken or brighten up the image.

Step 4: Vibrance (or Saturation) | JPG Processing Using Photoshop

Go to Image->Adjustment->Vibrance to increase the vibrance.

In case you do not have vibrance, then use saturation.

If you have vibrance slider, keep it to 22 or below.
if you have saturation (instead of vibrance), keep the amount to below 13.

Note: DO NOT make the above correction if you have already done this as a part of your RAW processing.

Step 5: Sharpen Image | JPG Processing Using Photoshop

1. Go to Filter->Sharpen->Smart Sharpen
2. Enter the radius as 0.3 for web-based posting and 1.3 for print (processed at 300dpi)
3. Now, keep incrementing the amount based on how much sharpening you need. Typically an amount between 70-100 is fine depending on how sharp or unsharp your original image is.
4. Keep “Remove” drop-down option to Gaussian Blur.
5. Rest of the values – keep it to default.

Step 6: Saving for e-mail/Web | JPG Processing Using Photoshop

1. Once the image is ready, go to Edit->Convert to profile
2. Make the “Destination Space” profile: sRGB IEC61966-2.1
3. Keep the others to default.
4. Hit Ok.
5. Now File->Save As, give the file name, keep the Format to JPEG. Make
sure under colour, you see the ICC Profile as sRGB IEC61966-2.1, if you don’t create a convert profile, it will be your working profile, which is ProPhoto RGB or Adobe RGB.
6. Once you say ok, in the JPEG Options, change the quality to 12 depending on the Size which is displayed below.

The above are the steps which I have been following for editing images in photoshop. This is how you can edit photos professionally using Adobe Camera RAW and Photoshop.Which part of the process do you like the most? Did I miss something? Do you have any questions? Let me know by commenting below.

There are other ways to achieve the same results recommended by other photographers. Feel free to choose the steps comfortable for you.

Happy Processing!

Newsletter

The All New Community based Photography Learning App

Install the #1 Photography Learning App on your Android and iOS phones.

right-trans

Free Photography Courses

right-trans

Easy Access to all Courses and Progress Tracking

right-trans

Course Completion Certificate

right-trans

New Android & iOS App in real-time sync with Web

right-trans

Genre-Specific Groups to Post images, invite and offer critique

right-trans

& lots more

Get our mobile app

Top Posts

Categories

Events News Photo Photo Tour Photography Tips Product Product Reviews Uncategorized