“Shoot to the right” – Now how many of us have heard this? This is a statement which many a photographers have made and explained on the internet and various tutorials. Let me try to simplify it by using some examples.
Here is a typical histogram for an image. It can be seen in your camera LCD when you playback an image and click info button in Canon and by pressing the down part of the circular button in Nikon (depends on camera model)
A typical Histogram

The right side of the histogram shows the highlights (bright) data, the left side shows the shadow (dark) data and the center part shows the mid tone data. Normally for a properly exposed image (no over or under exposure) the above is what we get. Of course, it purely depends on what kind of image it is. The curve starts and ends before the two extremes of the highlights or the shadow area.
Histogram representing an underexposed image.
If any part of the image is underexposed, this is what happens:

As you can see, on the left side the black part of the graph has gone beyond the vertical line, which means some part of the image is underexposed.
Histogram representing an overexposed image.

If any part of the image is overexposed, this is what happens:The right side of the graph has gone beyond the vertical line which means some part of the image is over exposed.
If your intention is not to over or under expose any part of the image, then typically the complete graph should be between the two extremes.
Now, lets try to understand what “Shoot to the right” means.
– The graph represents the data in your image. Consider an example where the graph ends much before the two extreme verticals, say 2 cm gap on either side.
– For that scene, when you overexpose by say 1 stop, the whole graph moves to the right (say on the right side the gap is now 1cm and on the left side the gap is 3cm)
– Now go back to zero exposure compensation and underexpose that same scene by 1 stop. The original graph would move to the left and you may have 1cm gap to the left and 3cm to the right)
You can get the same final image (wrt colours, exposure and other processing) from all 3 of the above images where we used different exposure settings.
One of the main advantage of shooting to the right is that the noise in the image is less if there are any dark areas in your frame. But does it make sense in Wildlife photography? May be, may not be. It is debatable.
You need to remember two things:
– Shooting to the right results in getting lesser shutter speed (depends on shooting mode)
– And shooting to the left results in a faster shutter speed for the same aperture + ISO, but at the cost of noise in image.
The above method of reading the histogram helps in getting a correct exposure for your images. That said, it is extremely critical to get the right exposure in the field.
Camera decides the exposure.
In real life example, here is what happens when you shoot in auto mode and let the camera handle the exposure:
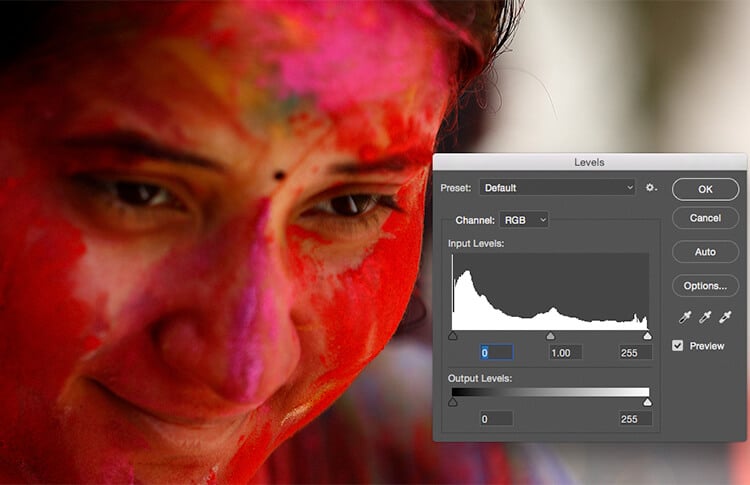
 The camera exposes the subject as a medium toned subject and the shutter speed and exposure goes for a toss. Look at the histogram (shown in levels in photoshop) and the shutter speed on the top right of the image.This has resulted in over exposed image and a very slow shutter speed, in turn causing image blur.
The Photographer decides the exposure.
Using the correct technique of exposure, if you under expose the image, this is what you get:
 Note: If your monitor is not properly calibrated, you will see everything dark and no details in black.But check the histogram, the graph ends well with in the left side vertical line, which means we have good exposure where we can see details in the black area. Also check the shutter speed. Because of correct exposure you have got a higher shutter speed in turn getting a sharp image
Of course, by using level adjustment in photoshop, you can get more details in black by increasing the brightness of the image by sliding in the right part of levels.
Another important aspect of digital photography is the correct usage of ICC profiles. If your image is not properly tagged, then there is no guarantee on the colours what you saw on your monitor and what is seen by others in their monitors.
Missing ICC profile for an image.
Normally when you open an image in PS (with some advanced colour settings) if there is no ICC profile tagged, this is what happens:


The above is a topic for another article. But I hope the above was helpful in making you understand about histogram and what role it plays in image making.
Learn More about all these concepts by subscribing to our online photography tutorials. Click below to subscribe: